Getting Started: Adding Your First Account
Welcome to Insyte!
Accounts are the foundation of Insyte. Every transaction, balance update, and spending insight begins with an account. Whether you're tracking a checking account, credit card, loan, or investment account, getting started only takes a minute.
Before You Begin
It's important to note Insyte does NOT connect directly to your financial institutions. All account and transaction information is entered and managed solely by you.
Step 1: Open the Add Account View
Insyte automatically recognizes you do not have any saved accounts, so you should see an "Add Account" button on the Dashboard, Accounts and Activity tabs. Tapping this will bring up the Add Account screen. You can also tap the "+" button in the bottom right of the tab bar, then select "Account".
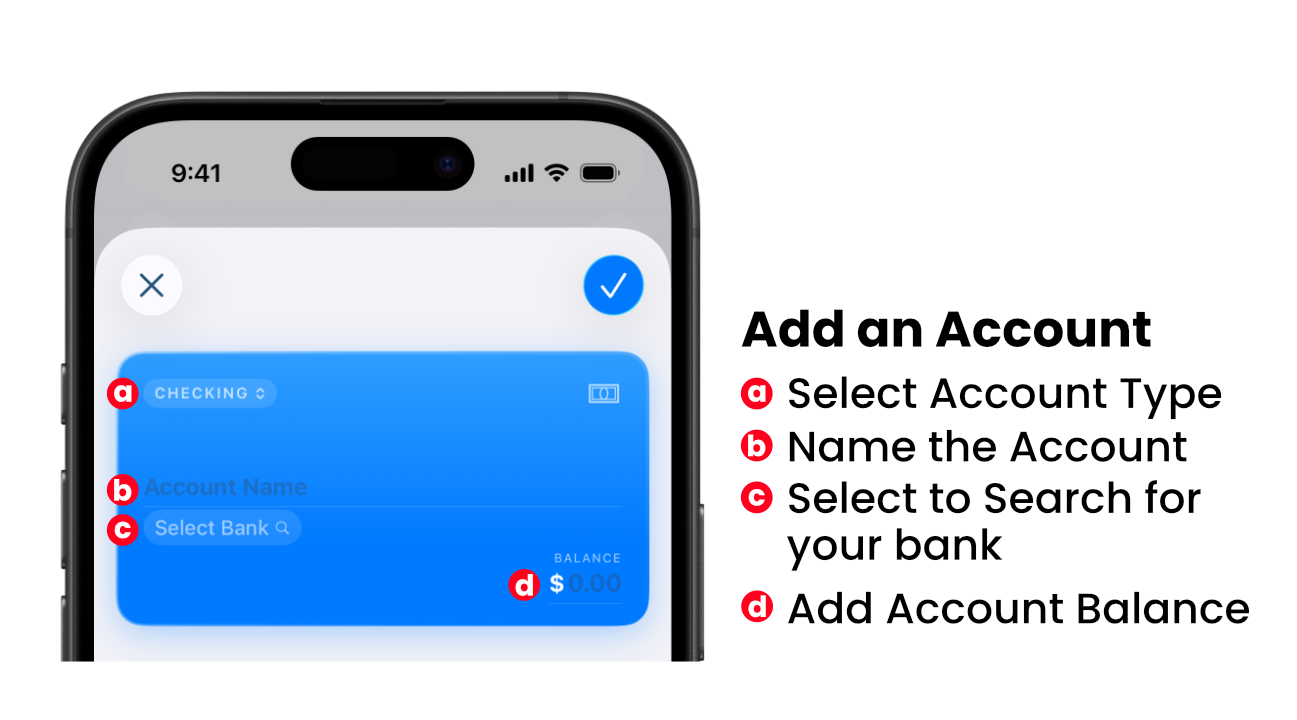
Step 2: Choose an Account Type (a)
Account details are added directly to the credit card that appears on the screen. Account type is selected in the upper left of the card, by default, Checking is selected.
Insyte currently supports the following account types:
- Cash
- Checking
- Savings
- Credit Card
- Loan
- Investment
- Retirement
- Money Market
- Certificate of Deposit (CD)
- Line of Credit
Choose the option that best matches the account you wish to track.
Step 3: Fill In Account Details
Completing the rest of your account information is pretty straightforward.
- Account Name (b) - Give your account a name that is easy to recognize.
- Select your Bank (c) - When you tap the select bank button, a pop up will appear to search for your bank. Insyte searches the register of all FDIC-insured banks and NCUA credit unions, but don't worry. If your bank is not found, you can always enter a custom name.
- Starting balance (d) - Enter the current balance of the account.
Step 4: Select a Card Color
Account cards have been designed to be customizable to not only allow for easy identification, but add a personal feel to the app. Tapping the circular color picker on the right of the "Card Color" list item will reveal dozens of color options. Users can also specify colors by RGB or Hex Code via the Sliders tab of the color picker.
Step 5: Select a Card Pattern (Optional)
If you want to add another personal touch to Insyte, add a pattern to your account card. Patterns appear in the background of each account card, and are card specific.
Step 6: Payment Due Date Reminders (Optional - Credit Card, Loan and Line of Credit Only)
For credit card, loan and line of credit account types, a due day option will appear, allowing users to select their payment due date and opt in to reminder notifications.
Step 7: Payment Schedules (Optional - Does not apply to Cash, Checking and Savings Account Types)
Payment schedules allow users to create an automatic payment template for the given account at specified intervals. Note: In order to select a "from account" option, you must have at least one account already saved.
Step 8: Save Your Account
When you're ready to save your account, tap the checkmark button to create the account. Your new account will automatically appear in the Accounts View and your account balance will be updated in the Dashboard view.
What's Next?
Now that you've added an account, you can:
- Add your First Transaction
- Create a Recurring Template
- Record a Balance Update
- Explore Spending Insights
- Import your Transaction History via CSV
- Personalize Settings in Insyte
Support
- New to OneGoal? Check out our Help Docs.
- Have questions? We’re here to help.